Monday, March 28, 2011

Fabric Easter Egg Door Hangers

I actually saw a version of this project earlier this month online and have made a few adjustments to it to make the construction and cost more feasible for large craft classes with Seniors in Assisted Living.  Since everyone loves to have seasonal door decorations- these Fabric Easter Egg Door Hangers are a big hit!
Supplies Needed are as follows:

  • Fabric ( at least two coordinating colors)
  • Poster board, card board or foam core for the backer
  • Batting ( two layers if very thin- one if thick)
  • Tacky glue
  • Pipe Cleaners- Two per "egg"
  • Hot glue/ hot glue gun
  • Embellishments- ribbon, flowers, Easter eggs, butterflies etc.
  • Plastic Easter Grass for pocket filler
  • Egg Template
  • Marker
  • Optional- felt to finish off back of fabric covered egg
Ora Mae with her Fabric Egg at Chambrel

Even Gentlemen can be crafty sometimes!

  1.  Make an Egg Template to trace- I used left over poster board from a previous project.
  2. Trace egg shapes onto card board or poster board and cut out.
  3. Trace egg shape onto batting ( exact size as board with no overlap) and cut out.
  4. Trace egg shape ( plus about 1 inch extra all the way around) on fabric and cut out.  
  5. Glue your batting onto the front of your poster board.
  6. Place fabric right side up on top of batting and glue edges all the way around on the back- you might need to trim extra fabric on the back.
  7. To make the pocket- use the same egg template as your guide and cut out a rectangular shaped piece wide enough to wrap around the middle of the egg and then glue the edges around the back to form the pocket.
  8. Twist your two pipe cleaners together to make a hanger and hot glue to the back of your egg.  If you are going to finish the back with a piece of felt, you would do that step at this point as well.
  9. Embellish your Egg with ribbon, flowers, leaves, butterflies, Easter eggs etc as you please.
  10. Fill pocket with Easter grass.  Pocket can then be filled with plastic Easter eggs, more silk flowers etc.
My class at Chambrel at Club Hill in Garland
The ladies at Horizon Bay in Grand Prairie are a crafty bunch!

Proud of her work of art!

Everyone did a great job with their decorations and really enjoyed this quick fun project! This is definitely a project that Seniors in many communities would enjoy- and would also be a great project to do with the grand-kids!

Till next time- Keep those creative juices flowing and enjoy this first month of Spring!

Stephane

Sunday, March 20, 2011

Top Considerations When Building an Enabled Garden for a Retirement Community

In honor of National Horticultural Therapy Week I want to address a topic near and dear to my heart- Horticultural Therapy or Garden Therapy programs.  I started working with Seniors primarily by planning and teaching Garden therapy projects and have expanded my Senior Activities business to include Art, Music and other activities. 
Working in our raised beds at the Village of Richardson


If your community decides they are interested in having a garden on site- here are a few key points to consider before jumping in:
 
Your first consideration should always be WHO? 

Who will take responsibility for overseeing, planning and maintaining your garden?  There needs to be someone willing and able to take a lead role.

Are enough members of your community interested in maintaining a garden?  Do you have a staff member who is knowledgeable about gardening that can design the garden plus plan and lead garden therapy activities? Or will you need help from an outside contractor (like Elder Life Engagement) to design your garden and plan your activities?  Are there local volunteer groups like Master Gardeners, Boy Scout troops, church groups or a garden clubs willing to help plan the garden, build raised beds and assist with your project?  

Next consideration-WHERE! 

Where will your garden be located on the property and what type of garden will it be?

The location of your garden is very important because it will determine the type of plants you can grow due to sun exposure and water availability.  If you want to have a kitchen or culinary garden and grow herbs and vegetables- then your beds will need at least 6 to 8 hours of “sunbathing” direct sunlight each day.  If your desire is to have a cutting garden , rose garden or butterfly garden- you will need to have a good amount of sun for most flowers to grow well- especially roses.  If you want to create a serene Zen or meditation garden with ferns, moss, water features and shade flowers, then a shaded or tree covered area will work best for you.

When designing your garden- make sure the paths are built wide and easily accessible to those in wheelchairs and walkers- at least 3- 3½’ in width.  The main paths should be paved and secondary paths should have packed crushed rock- especially between and around beds for easy wheelchair access.  There should be plenty of shade provided and seating areas dispersed within the garden.  Remember- Seniors really don’t like to get too much sun or be too cold- ever!

Another very important consideration is how the garden will be watered.  If you have a water source nearby and lots of extra time, you may choose to hand water your beds or containers and set up a calendar to remind caretakers when and how much they should water.  However, designing your garden beds with a drip irrigation system is optimal as it saves money, time and water by slowly releasing water only to your plants as needed.

In addition to a drip irrigation system, you could consider connecting rain water barrels to your drip system and collect rainwater from your facilities’ roof.  Many facilities already have an irrigation system in place to water the grounds, and that type of irrigation system can be incorporated into your plan as well.

When planning your garden, be sure to group plants with similar water needs together- thus plants are not under or over watered and you save valuable natural resources and money in the process.  If you are planning a flower, butterfly or wild life garden do you want to plant perennials that come back year after year, annuals for a pop of color or a combination of both types of plants?  And with Memory Care residents, you must always be certain that your plants are not toxic or harmful if eaten by a resident.

Finally-WHAT!  What type of garden containers will you have?

Will you choose to use portable containers like large pots, window boxes or half wine barrels for your garden?  The optimal choice is to build accessible planters or raised beds so those who use walkers or wheel chairs can access both sides and the middle of the bed.  Beds or containers should only be 3 feet wide so that the middle of the bed can easily be reached from any side.  Having raised beds at different heights insures that both Seniors who can stand to garden and seated Seniors can access the beds easily.  Another container option is using low hanging baskets or a specially designed vertical wall garden for herbs or succulents. 

Regular beds are difficult for Seniors to maintain since many cannot bend, kneel or squat to place plants or pull weeds for long periods of time.

Gardening is an excellent activity for Elders.  With a well thought-out and designed garden, a dedicated Horticultural Therapist or program leader, and enthusiastic participants -your garden will provide years of enjoyment for your participants, your retirement community and their loved ones.

Until next time- Hope you enjoy the first week of Spring and many beautiful days to come!

Stephane

Tuesday, March 15, 2011

Dyed Rice Mosaic Projects

Finished Dyed Rice Mosaic
One of my class members- Kris Brown at Horizon Bay in Plano- recently suggested that we try to do dyed rice mosaics because her classes really had fun doing them.  Kris was an art teacher in her previous life, and is a great source of inspiration and ideas- as are many of my students.  I had never heard of doing mosaics with dyed rice- so I thought I would give it a try.  I did a quick search on the internet about how to go about dying rice and found a few different "recipes".  Since many times Activity Directors have limited budgets for art projects- I think this one would be a great one to try out.

The mosaics seem to be a two class project for everyone so far- so I would plan for this project to take 2-3 hours from beginning to end.

Dyed Rice Tutorial-

Supplies you will need to dye the rice:

Measuring Cup
Tablespoon
Rubbing Alchohol
Inexpensive White Rice
Food Coloring- I used fluorescent and regular dye
Plastic Locking Sandwich bags
Plate to dry rice on
Storage containers with tight lids

Dry the rice flat in plastic plates
The recipe is quite simple- one cup rice + 1 tablespoon rubbing alcohol + 4-8 drops food coloring per batch of rice.  You can create quite a few bright colors using a little color theory and trial and error- I even made a blackish brown for sunflower centers today.

Creating your mosaic-

  • Download simple stained glass patterns from the internet with little detail like geometric shapes,  flowers, butterflies and birds.
  • Cut out pattern and glue it to a black card stock backgroud to give the mosaic stability ( it becomes quite heavy)
Geometic Design Starting to come together
  • Use thick glue to adhere rice like Tacky Glue.
 
  • Work only a small section at a time, spreading glue to the edges of the section with a Q-tip.It works best to do all the sections of the mosaic with the same color before moving to the next color.   (Creates less "confetti"rice ) 
  • Dump excess in a plastic plate so it can be reused
  • Fill in any places where the rice is missing until completed
Several of my classes have been working with the dyed rice mosaics this month and have been having a fun time creating their masterpieces.  This is not only a good creative project, but it also helps with hand dexterity and hand/eye coordination.

Here are some of my ladies from Horizon Bay with their artwork:

Florence at Horizon Bay
Beverly's creation is really coming together!
Ethna seems pretty pleased!
Kris- who started it all!
Very Precise!
Another great job by Inez

Another group at Atria in Richardson:

Enjoying the creative process!
Making a pretty sunflower
Dorothy perfecting her work as her daughter looks on.
To finish out the project- I suggest cutting out the finished mosaic and re-matting onto a clean piece of black card stock because glue spills do show up on the card stock.  I actually cut my finished design out and put it in a floating frame.  This project takes patience and some of my students have gotten frustrated- but it is a fun project to try- and is a great project for elders to do with their grand children.  The rice is so colorful- it could be used in the same ways as sand art in bottles.

Right now I am working on an "easy" batik project.  I found it originally on That Artist Woman's blog as have many folks- and am doing a sample project right now.  The Batik project is definitely a 2-3 class project as it has several steps and requires drying time between steps.  Will post the results later this month.

Till Then-

Good luck with the new time change- and get ready for Spring projects!

Stephane

Sunday, March 6, 2011

March 2011 Dirt Therapy Classes

Benefits of Dirt Therapy for Senior Citizens

We design Gardening programs for Seniors that meet the special needs of the specific Senior population we are working with.   The physical, mental and emotional benefits of gardening activities may be slightly different when working with Memory Care residents compared to very able Independent seniors.  But gardening is beneficial for Seniors of all ages and ability levels and is enjoyed by many Seniors.

We believe garden related activities and “enabled gardens” should be designed to be accessible to all.  For example, raised garden beds, raised boxes, wall gardens, hanging plants and small individual containers can all be used in accessible Garden Therapy programs.   We encourage Seniors with physical or cognitive limitations are to actively participate in planning and caring for the garden or their container plants so they feel a greater sense of accomplishment and ownership.  For Memory Care residents, keeping projects simple and providing hand over hand instruction is important when helping them complete tasks independently.

Our Dirt Therapy activities are unique in that they use living materials requiring nurturing and care.  The natural life cycle of plants provides participants with plenty of ongoing horticultural tasks and activities that stimulate thought and exercise and encourages an awareness of the seasons and the environment.  This is especially important for Memory Care participants.

Gardening with Seniors in retirement facilities and communities is a very gratifying activity for all involved.   A recent survey by the National Endowment for the Arts found that 63% of survey participants ages 65-74 and 53% of those ages 75-96 work with indoor plants or garden outdoors for pleasure.  Another survey by the Roper Organization indicated that 33% of people 60 years or older are likely to say that gardening is an avid hobby or interest.

Our Dirt Therapy classes help retirement housing providers and health care administrators provide Senior residents with fun activities that improve quality of life and provide sensory and visual stimulation, social involvement, and healthy exercise.  And as the Baby Boomer Generation ages, we believe the need for unique activities and  horticultural therapy programs will continue to grow.

We believe gardening should be about getting dirty without feeling guilty, enjoying the results of a job well done and taking the time to soak up the sun and serenity that being in nature offers all of us.  

Benefits of Garden Therapy include:

Improved Physical Functioning-   Garden activities provide moderate exercise and builds fine motor skills by planting seeds or transplanting seedlings.  Activities like digging and weeding improve gross motor skills. For those with limited mobility, even standing and working in raised beds provides an opportunity for good exercise.

Sensory Stimulation-   Aging often involves loss or reduction of sensory capabilities so it becomes important to stimulate the senses that remain.  Simple garden tasks improve hand-eye coordination and touching plants and smelling herbs and flowers can stimulate the senses and trigger happy memories from the past.

Improved Emotional Status-   Garden projects and activities help build each participant’s self esteem and confidence as they are encouraged to make decisions and think creatively when completing personal projects.  Working with plants fosters a sense of nurturing and purpose and these tasks and projects can often provide structure and activities that alleviate depression and alter negative feelings. 

Social SkillsGarden programs provide an excellent opportunity for participants to interact with group leaders and other participants through sharing materials and creative ideas, assisting others with tasks, and sharing stories and memories of previous gardenling experiences with others.

Dirt Therapy classes at Silverado Senior Living in Plano, TX-

Silverado is a wonderful Memory Care Community that provides great care for their residents.  Recently we were able to get back to gardening thanks to a sunny early March day.
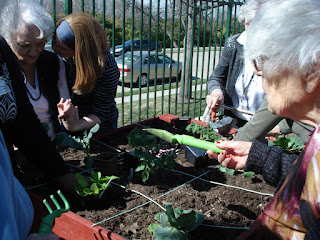
Planting late Winter veggies first week of March

Miss G hard at work!


Enjoying our afternoon in the sun!


We had a great day planting one of our raised container beds this past week.  Had a beautiful sunny 70 degree day in Dallas, and we enjoyed getting our Vitamin D the natural way!

Garden Club Class at Atria in Carrollton-

This is the second year for our Garden Club at Atria in Carrollton.  Atria is a great Assisted Living facility and they have a beautiful courtyard for the residents to enjoy.  We work in the flower beds and plant large containers and pots.  This past week we planted some early Spring annuals and a few bulbs to liven up the courtyard.  Some of the ladies were happy to soak up the sun and give moral support while others rolled up their sleeves and got some dirt under their fingernails!

Planting early Spring annuals

Hard at work and getting hugs!

Getting Vitamin D the natural way

Happy just to supervise our work!
We have a lot of garden classes schedule throughout the Spring so I'll share more of our progress as the growing season moves along.


Till next time-  Put your hands in the earth and get ready for Spring!

Stephane

Wednesday, March 2, 2011

Latin Rhythm and Movement classes

We've been having a lot of fun in our new Latin Rhythm and Movement classes this year!  These classes are especially good for Seniors living in Memory Care and Assisted Living Residences.  We can engage a large number of residents with this activity- and Seniors really enjoy learning how to play all the different Rhythm instruments.

How the class works:

At the beginning of each class we start each resident with shakers and have a follow along session- encouraging them to copy hand and arm movements so they get some light fun exercise along with musical fun.  Then each resident is given a different instrument to play- from Tamborines and maracas to gyros and cowbells- after several songs, we switch instruments to keep interest high and keep everyone engaged in the activity.

Getting into the Rhythm at the Courtyard
Live Action Shot at the Courtyard
Keeping a steady rhythm with the wood block.
Taking a break between songs

Keeping time!
Trying out new instruments

This activity is open to large groups and usually fully engages Memory Care residents for 45 minutes to an hour.   This is an activity that both men and women usually enjoy equally.  Sometimes we even have a few dancers in our group!

Looking forward to a lot more fun with Latin Rhythm this year!

Till next time- Stay Creative and Shake those tail feathers!

Stephane