Showing posts with label Alzheimer's. Show all posts

Friday, September 28, 2012

Lasagna Muffins Recipe and Instructions

This summer I started teaching a new "Yummy Bites" class and it has been a lot of fun!  We have baked Pie Pops, Pie in a Jar, Peach Dump Cake and Ice Cream Cone Cupcakes.  I try to choose projects that are fun and can be served individually.  I also like projects that do not require 50 ingredients and that my residents have not tried before.  Most recently we made "Pinterest inspired"  Individual Lasagnas baked in a muffin tin.  And Oh Boy- were they good!

Lasagna "Muffins"- YUMMY!


I sort of followed a recipe, and sort of did my own thing- which is the way I cook at home.  But I will give you the basic recipe and you can embellish as you please:

Lasagna "Muffins"

Wonton Wrappers
Bottled Spaghetti sauce of your choice
Medium Onion
Ground Turkey
Olive Oil
Cooking Spray
Italian Spices and salt and pepper to taste
1 Egg
Garlic ( I was lazy and bought the minced stuff in the store)
Parmesan Cheese
Ricotta Cheese- small tub
Italian Cheese Mix-whole bag

I originally planned to add mushrooms but one of my ladies didn't like them so I left them out.  But at home we probably would have added mushrooms and since my daughter is vegetarian, made it with zucchini, mushrooms, onion, sun dried tomato and spinach and left the turkey out altogether.

First Brown your onion and turkey in a splash of olive oil.  Add garlic and Italian Seasonings to taste along with a little salt and pepper.

Miss Willie- My Assistant :-)

Once your meat is browned add spaghetti sauce so that the flavors can mix together before you construct your mini lasagnas.

Lightly Spray the muffin tins (Jumbo Muffin Tins, not regular) with cooking spray.

Layer  and overlap your wonton wrappers ( which can be found in your grocer's  refrigerated produce section) into the bottom and sides of your tins (about 3 each).  They dry out pretty fast, so cover them up.

First Step

Mix up your cheeses-  I think the Ricotta Cheese is a 16 oz tub- plus 1 egg, more italian seasoning or fresh parsley, a whole bag of Italian Cheese mix.

Then layer meat sauce, cheese, wonton, meat sauce and cheese and add some parmesan on top.

Ready to go in the oven!

Bake at 350 for about 15-25 minutes or until your cheese browns on top.  It's always best to let lasagna sit for a little while, but we dug in right out of the oven and they were quite tasty.  I can't wait to try a vegetarian version at home!

Hope you try these out- and let me know how you like em!

Till next time-  Stay creative both in and out of the kitchen!

Stephane


Fabric Covered Tissue Roll Pumpkins Tutorial

Fabric Covered Tissue Roll Pumpkin


This year is just zooming on by!  I can't believe September is almost gone- and the holiday season is quick approaching.  I have so many fun projects in store for Fall- thanks to lots of great inspiration from my favorite guilty pleasure- Pinterest!

In fact this next project was inspired by a few different versions of Fabric Covered Tissue Roll Pumpkins I saw out on the"Interweb".  I put my own little spin on the project and combined several ideas to create a fun design.  These are great projects for folks in Memory Care- but some of my Assisted Living  and Rehab folks have enjoyed making these as well.  If you find remnants or find a great sale on fabric-  these pumpkins come in at around $1.50 each.

Quick Tutorial and supplies needed to make this project:

Toilet Tissue Roll
Batting
1/4 yard fabric for each pumpkin
Brown paper to make stem
Brown  pipe cleaner
Silk flowers and leaves
A pen, glue stick or wood skewer to "poke" with
Glue Gun


Instructions-

First Smoosh your roll of toilet tissue so that it is not obvious what your pumpkin is made from.  Cut two pieces of batting about 3-4 inches wide and long enough to just tuck into the cardboard roll.  Take your fat quarter and center your batting on top in an X. 
First Step is to Smoosh your Toilet tissue roll
Tuck your batting and  fabric into the center of the tissue roll
First tuck in your batting, then start tucking your fabric starting with one of the longer corners.  Remember to tuck in one direction, and turn your project as you tuck and pleat the fabric into the center of your toilet roll.  You may need to use a little muscle to make sure you get it all tucked in nicely!

Ready to add the stem!
Once all your fabric is nicely tucked in, you take your brown paper and roll it into a tube, then twist and scrunch it into a stem for your punkin'.  No glue is needed, just stuff in in.

Wrap your pipe cleaner around a pen or your index finger to make a vine, then fold it in half.  Glue your pipe cleaner, leaves and fall silk flower at the top- and you are finished!

Ta Daaa!!!
Even the Gentlemen at Horizon Bay in Arlington like this one!
Our pretty pumpkins all in a row!
This is a fun fall project and could be modified to be jack-o-lanterns or apples.  You could wrap with burlap but if the fabric gets too thick it is hard to stuff in the center of the tube.   I highly recommend this as a project for Seniors who are in Memory care- as it is a very easy project with attractive results.

Till next time-  Stay Creative and Enjoy the Cooler Weather!

Stephane

Busy Little Bees Part 1

Happily, my class schedule is getting busier every month, and I have not had a lot of time to post.  Summertime was a very busy creative time in our "Get Your Craft On" classes, Dirt Therapy classes and Poly Clay Jewelry classes.   I would like to share with you a few of the projects we completed over the last few months.  Unfortunately, I sometimes forget to take pictures, so many of our projects go unrecorded- including some great tumbled stone decoupaged coasters, reed diffusers with customized fragrances and decorated vases and patriotic door hangers.

Going all the way back to July 4th- Here is a fun watercolor/ mixed media flag inspired project. I taught this project to seniors in Assisted Living and modified it for my Memory Care students as well.  Everyone was very happy with the results!  We painted the design in watercolor, applied glitter to the stars and dimensional paint to the frame.  We raised the stars with small pieces of foam core for a three dimensional look.
Patriotic Art Created by one of my students at Winters Park in Garland

One of the most popular projects of the summer were our painted tote bags with felt button embellishments.  I found some great tote bags at the Dollartree and used DecoArt fabric paints.  We embellished with Felt flowers and buttons from Michaels.

Pretty Tropical Bag for a Pretty Lady!

Another Happy Customer at Horizon Bay In Arlington, TX
In addition to our regular Arts and Craft classes- we sometimes work on Garden decorations.  Here is a great example of our completed pots for the patio at Silverado in Plano Texas.  These pots were made by my Memory Care students.  The designs were made by using our fingertips as the body of our butterflies.  The black painted details really make the designs stand out.  We placed the pots on their front porch area where they sit and enjoy time outside when it is nice.

Fingerprint Butterfles and Felt Flower Plant Pokes
Painted Pots with Summer Hardy Annuals


In addition to planting out our pots, we started vegetables from seed and planted them in our raised beds.  Here are a few of our sucesses.  Cucumbers, peas and radishes did pretty well until the really hot summer weather kicked in.

Cucumbers and Peas on the Bamboo Trellis
Cucmber on the Vine
We also have been having fun in our Poly Clay Jewelry Making classes.  I have found the secret to success- always keep all my students working on the same project.  In the past, I had the ladies make lots of different styles of beads and they would end up working on different projects- and many times, nothing ever got completed.  Now I choose one project and we all do the same design (then put our own spin on the project).

We recently tackled making Polymer Clay Calla Lily pendants and they came out beautifully!
Close up on our Calla Lily Pendant

Dee Dee and June at Signature Place in Dallas       


Tuesday, November 8, 2011

It's Fall Ya'll! Let's Make Door Decorations!

I can't believe October flew by so fast and we are already into the 2nd week of November!

I haven't had much time to post about our projects recently but would like to share some of the fun crafts we have been making the past month.  The ladies love to decorate their doors so we put together some fun door hangers for fall including a great Pieced Paper Owl project, a Stuffed Brown Paper Pumpkin door hanger and a Cork and Scrapbook paper Turkey door hanger.  Both the Owl and Pumpkin projects start with  brown kraft paper as their base.  Both are stuffed to add dimensions.  Both are embellished with silk flowers, raffia and scrapbook paper.


Owl Pieced Paper Project


Bonnie and Ora Mae were really happy with their owls!

Mary and Evelyn's owl projects turned out great!

Showing off her Pumpkin with pride!

Happy with her Door Hanger.

My students at Christian Care Center really like their pumpkin door hangers!

Cork and Scrapbook Paper Turkey Door Hanger

The Turkey Door Hanger  base is made from a circle of thick cork, embellished with Fall scrapbook papers, felt gobbler, foam legs and google eyes.

I still haven't got my head wrapped around Christmas yet- but will be starting to make Christmas ornies and decorations this month.  Seems like we just had Halloween!

Till Later-  Have Fun and Be Creative!

Stephane


Thursday, June 9, 2011

Proven Benefits of Art Programs for Seniors Living in Retirement Communities

With a slow-to-rebound economy and tight Activities budgets, one of the biggest challenges for Activities Directors who work with Seniors in Memory Care or Assisted Living Residences is deciding how to allocate their limited monthly Activities budget.

Why should they choose an art program over other entertainment? What are the benefits of choosing to incorporate creative art activities rather than opting for passive entertainment- even though the group participating in the art class may be smaller than a group enjoying a musical entertainer?

At first glance an entertainer seems to get more "bang for the buck". But participation in art programs has been shown to have a very positive long-term effect for residents. One compelling reason to incorporate an ongoing art program for residents is that while Alzheimer's and dementia damage the portions of the brain that have to do with memory and planning complex tasks, the part of the brain that is involved in emotion and aesthetic appreciation remains intact for much longer. Patients with Alzheimer's have difficulty with attention and concentration, but experts say that art therapy has provided an extraordinary outlet for them.

Dr. Gene Cohen, director of the Center on Aging at George Washington University, has studied the effect of art on people with Alzheimer's and has said "Art is a wonderful activity that taps into imagination. Even with the loss of memory, the capacity for imagination still has its place. That is one reason there has been increasing attention to art for people with Alzheimer's. Even as memory fades the imagination has the capacity to be robust.''

Art therapist Ruth Abraham, author of When Words Have Lost Their Meaning: Alzheimer's Patients Communicate Through Art (Praeger Publishers, 2004), agrees: "Art therapy has been shown to be a powerful tool for people with Alzheimer's; it helps them to express their feelings when they can no longer do so with words. This use of art helps people with Alzheimer's disease feel less lonely and isolated. It can also calm their restlessness."


Some of the proven benefits of engaging in creative activities with older adults are:
  • Provides a form of nonverbal communication and expression
  • Gives the individual a sense of choice and control
  • Helps to reduce stress, fear, and anxiety
  • Enriches relationships and encourages socialization
  • Activates the senses and inspires spontaneity
  • Encourages playfulness and a sense of humor
  • Restores and motivates muscle memory
  • Improves cognition and focuses attention
  • Evokes new opportunities for connecting with others
  • Reduces boredom
  • Leads to self-expression and self-discovery
  • Improves emotional and physical health
  • Nurtures a sense of Self and renewed self-esteem
  • Promotes relaxation and decreases disruptive behavior

I have seen first-hand while teaching art and craft classes to Seniors living in Memory Care and Assisted Living that they really do express their personal style, likes and dislikes, and individuality in their art projects although when some have later stage Alzheimer's. Even though we start each project with a sample to copy, similar color choices and supplies when individuals are encouraged to create their project in their own way- every project turns out unique and different- just like the person that created it.
 
Since I am not an art therapist, I don't have particular goals set for each class member when we are doing a project- we just concentrate on having fun, expressing creativity and socializing with the group. Many times class members are afraid they will "get it wrong" but with assurance that "There is no wrong or right in art" so they can't do anything wrong they feel freer to express themselves as they want. Going into a project with that attitude usually helps students relax and just enjoy the process- and the results can be truly amazing!

Doing something creative each day- whether it is gardening, listening to music, painting, cooking or telling stories- is a wonderful way for individuals coping with the effects of Alzheimer's and dementia to connect to an important part of who they are- and who they have always been.

Sunday, March 20, 2011

Top Considerations When Building an Enabled Garden for a Retirement Community

In honor of National Horticultural Therapy Week I want to address a topic near and dear to my heart- Horticultural Therapy or Garden Therapy programs.  I started working with Seniors primarily by planning and teaching Garden therapy projects and have expanded my Senior Activities business to include Art, Music and other activities. 
Working in our raised beds at the Village of Richardson


If your community decides they are interested in having a garden on site- here are a few key points to consider before jumping in:
 
Your first consideration should always be WHO? 

Who will take responsibility for overseeing, planning and maintaining your garden?  There needs to be someone willing and able to take a lead role.

Are enough members of your community interested in maintaining a garden?  Do you have a staff member who is knowledgeable about gardening that can design the garden plus plan and lead garden therapy activities? Or will you need help from an outside contractor (like Elder Life Engagement) to design your garden and plan your activities?  Are there local volunteer groups like Master Gardeners, Boy Scout troops, church groups or a garden clubs willing to help plan the garden, build raised beds and assist with your project?  

Next consideration-WHERE! 

Where will your garden be located on the property and what type of garden will it be?

The location of your garden is very important because it will determine the type of plants you can grow due to sun exposure and water availability.  If you want to have a kitchen or culinary garden and grow herbs and vegetables- then your beds will need at least 6 to 8 hours of “sunbathing” direct sunlight each day.  If your desire is to have a cutting garden , rose garden or butterfly garden- you will need to have a good amount of sun for most flowers to grow well- especially roses.  If you want to create a serene Zen or meditation garden with ferns, moss, water features and shade flowers, then a shaded or tree covered area will work best for you.

When designing your garden- make sure the paths are built wide and easily accessible to those in wheelchairs and walkers- at least 3- 3½’ in width.  The main paths should be paved and secondary paths should have packed crushed rock- especially between and around beds for easy wheelchair access.  There should be plenty of shade provided and seating areas dispersed within the garden.  Remember- Seniors really don’t like to get too much sun or be too cold- ever!

Another very important consideration is how the garden will be watered.  If you have a water source nearby and lots of extra time, you may choose to hand water your beds or containers and set up a calendar to remind caretakers when and how much they should water.  However, designing your garden beds with a drip irrigation system is optimal as it saves money, time and water by slowly releasing water only to your plants as needed.

In addition to a drip irrigation system, you could consider connecting rain water barrels to your drip system and collect rainwater from your facilities’ roof.  Many facilities already have an irrigation system in place to water the grounds, and that type of irrigation system can be incorporated into your plan as well.

When planning your garden, be sure to group plants with similar water needs together- thus plants are not under or over watered and you save valuable natural resources and money in the process.  If you are planning a flower, butterfly or wild life garden do you want to plant perennials that come back year after year, annuals for a pop of color or a combination of both types of plants?  And with Memory Care residents, you must always be certain that your plants are not toxic or harmful if eaten by a resident.

Finally-WHAT!  What type of garden containers will you have?

Will you choose to use portable containers like large pots, window boxes or half wine barrels for your garden?  The optimal choice is to build accessible planters or raised beds so those who use walkers or wheel chairs can access both sides and the middle of the bed.  Beds or containers should only be 3 feet wide so that the middle of the bed can easily be reached from any side.  Having raised beds at different heights insures that both Seniors who can stand to garden and seated Seniors can access the beds easily.  Another container option is using low hanging baskets or a specially designed vertical wall garden for herbs or succulents. 

Regular beds are difficult for Seniors to maintain since many cannot bend, kneel or squat to place plants or pull weeds for long periods of time.

Gardening is an excellent activity for Elders.  With a well thought-out and designed garden, a dedicated Horticultural Therapist or program leader, and enthusiastic participants -your garden will provide years of enjoyment for your participants, your retirement community and their loved ones.

Until next time- Hope you enjoy the first week of Spring and many beautiful days to come!

Stephane

Sunday, March 6, 2011

March 2011 Dirt Therapy Classes

Benefits of Dirt Therapy for Senior Citizens

We design Gardening programs for Seniors that meet the special needs of the specific Senior population we are working with.   The physical, mental and emotional benefits of gardening activities may be slightly different when working with Memory Care residents compared to very able Independent seniors.  But gardening is beneficial for Seniors of all ages and ability levels and is enjoyed by many Seniors.

We believe garden related activities and “enabled gardens” should be designed to be accessible to all.  For example, raised garden beds, raised boxes, wall gardens, hanging plants and small individual containers can all be used in accessible Garden Therapy programs.   We encourage Seniors with physical or cognitive limitations are to actively participate in planning and caring for the garden or their container plants so they feel a greater sense of accomplishment and ownership.  For Memory Care residents, keeping projects simple and providing hand over hand instruction is important when helping them complete tasks independently.

Our Dirt Therapy activities are unique in that they use living materials requiring nurturing and care.  The natural life cycle of plants provides participants with plenty of ongoing horticultural tasks and activities that stimulate thought and exercise and encourages an awareness of the seasons and the environment.  This is especially important for Memory Care participants.

Gardening with Seniors in retirement facilities and communities is a very gratifying activity for all involved.   A recent survey by the National Endowment for the Arts found that 63% of survey participants ages 65-74 and 53% of those ages 75-96 work with indoor plants or garden outdoors for pleasure.  Another survey by the Roper Organization indicated that 33% of people 60 years or older are likely to say that gardening is an avid hobby or interest.

Our Dirt Therapy classes help retirement housing providers and health care administrators provide Senior residents with fun activities that improve quality of life and provide sensory and visual stimulation, social involvement, and healthy exercise.  And as the Baby Boomer Generation ages, we believe the need for unique activities and  horticultural therapy programs will continue to grow.

We believe gardening should be about getting dirty without feeling guilty, enjoying the results of a job well done and taking the time to soak up the sun and serenity that being in nature offers all of us.  

Benefits of Garden Therapy include:

Improved Physical Functioning-   Garden activities provide moderate exercise and builds fine motor skills by planting seeds or transplanting seedlings.  Activities like digging and weeding improve gross motor skills. For those with limited mobility, even standing and working in raised beds provides an opportunity for good exercise.

Sensory Stimulation-   Aging often involves loss or reduction of sensory capabilities so it becomes important to stimulate the senses that remain.  Simple garden tasks improve hand-eye coordination and touching plants and smelling herbs and flowers can stimulate the senses and trigger happy memories from the past.

Improved Emotional Status-   Garden projects and activities help build each participant’s self esteem and confidence as they are encouraged to make decisions and think creatively when completing personal projects.  Working with plants fosters a sense of nurturing and purpose and these tasks and projects can often provide structure and activities that alleviate depression and alter negative feelings. 

Social SkillsGarden programs provide an excellent opportunity for participants to interact with group leaders and other participants through sharing materials and creative ideas, assisting others with tasks, and sharing stories and memories of previous gardenling experiences with others.

Dirt Therapy classes at Silverado Senior Living in Plano, TX-

Silverado is a wonderful Memory Care Community that provides great care for their residents.  Recently we were able to get back to gardening thanks to a sunny early March day.
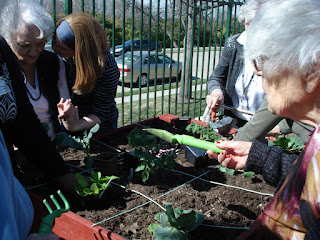
Planting late Winter veggies first week of March

Miss G hard at work!


Enjoying our afternoon in the sun!


We had a great day planting one of our raised container beds this past week.  Had a beautiful sunny 70 degree day in Dallas, and we enjoyed getting our Vitamin D the natural way!

Garden Club Class at Atria in Carrollton-

This is the second year for our Garden Club at Atria in Carrollton.  Atria is a great Assisted Living facility and they have a beautiful courtyard for the residents to enjoy.  We work in the flower beds and plant large containers and pots.  This past week we planted some early Spring annuals and a few bulbs to liven up the courtyard.  Some of the ladies were happy to soak up the sun and give moral support while others rolled up their sleeves and got some dirt under their fingernails!

Planting early Spring annuals

Hard at work and getting hugs!

Getting Vitamin D the natural way

Happy just to supervise our work!
We have a lot of garden classes schedule throughout the Spring so I'll share more of our progress as the growing season moves along.


Till next time-  Put your hands in the earth and get ready for Spring!

Stephane